This article will tell how the TicTacToe be made; You will know what are the components using to build the TicTacToe and how they work together;

SimpleTDD is a simple unit test framework that help you to develop tests to examine the behaviour of your codes;
My Goals is to help developer to make a Test for specific function easy and fast.
Introduction
This article will talk about the Game & Media Design of a TicTacToe:
Source Location:
https://github.com/tklee1975/TicTacToeCcx3

This is a tic-tac-toe game developed using cocos2d-x 3.x;
If you want to know more about its game design, click here for the detail;
If you want to know more about how to code it, click here for the detail;
Repository : https://github.com/tklee1975/TicTacToeCcx3
After a new cocos2d-x project is created and able to build & run, there are still few things to be done before in order to make your further developments more smooth;
Introduction
Cocos2d-x is just released the version 3.3; This article is about how to setup the cocos2d-x engine to build game for iOS Android

Download Site
Official site at http://www.cocos2d-x.org/
Download at http://www.cocos2d-x.org/filedown/cocos2d-x-3.3.zip
Setup the cocos2d-x engine
After the cocos2d-x 3.3, there are few steps to setup it up;
1. Required Software
Remember the following be installed first
2. Unzip the cocos2d-x-3.3.zip
Unzip the zip to a folder you want, I will called this as “cocos2dx-root” in this article;
For my cocos2dx-root, it is /workspace/ccx3/engine/
3. Run the setup script
After running setup.py, your .bash_profile will be changed; the paths of cocos2dx will be added to the .bash_profile so that it is easy to run the scripts provided by cocos2dx
4. Test whether working or not
$ cocos
This is the cocos command line tool; If the installation is okay, you will see the help of it
Create a new project
1. Setup the project root folder
It is important to organise projects so that it is easy to find the project you want;
For my practice, I will create the project root near the cocos2dx-root: Like the followings:
/workspace/ccx3
/workspace/ccx3/engine —> the cocos2d-x root
/workspace/ccx3/project —> the project root
/workspace/ccx3/project/MyGameA —> My game project A
2. Run the project creation script
$ cd $(project root)
$ cocos new MyGame -p com.MyCompany.MyGame -l cpp -d ./
If success, the project folder called MyGame will be created under $(project root)
Trim Down the project size (Optional)
When create the project using the command line tool, it will clone a copy of cocos2dx sources to your project folder;
Besides, it will also create different project files for different platform such Windows or Linux;
If your disk space is a concern to you, you can study the following instructions:
1. Change cocos2dx library from concrete folder to symbolic link
These are the commands to change the cocos2d core library from lots of file in order a symlink which have same effects;
$ cd $(your game folder)
$ rm -r cocos2d
$ ln -s ${cocos-root} ./cocos2d
2. Remove the project file of others platform
If you are developing iOS and Platform only, run the following to trim:
$ rm -r ./proj.linux
$ rm -r ./proj.win32
$ rm -r ./proj.win8.1-universal
$ rm -r ./proj.wp8-xaml
Build and Run in iOS
1. Simply open the project file at ${game-folder}/proj.ios_mac/MyGame.xcodeproj in Xcode;
2. Select the scheme “MyGame iOS”
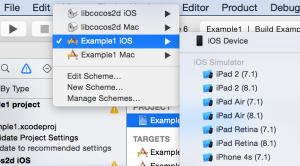
3. Clean, Build and Run
Build and Run in Android
For android, it is a bit difficult; Since Android programming is based on Java, to use C++, Android using a technology called “NDK” to let user C++ inject to the java code base;
The way that cocos2d-x do is compile our game code and cocos2dx engine intro a C++ binary which can be used by Android Java code;
(note: it is a simple explanation, to know the detail, you should visit android ndk site)
So to workout Android build, we need to do the following steps:
1. Compile the game static library
$ cd ${game-folder}/proj.android
$ ./build_native.py
When success, you will see the message similar to the following screens:
![]()
And the core binary file “libcocos2dcpp.so” will be created;
2. Import to Eclipse (Android ADT)
To run our game in Android, we need to use eclipse to import the project once;
Note: Recently, cocos2d-x isn’t supporting Android Studio; I tried to solve that and it seem very hard to work it out; Cocos2dx says they will be handle it in cocos2d-x 4.x
To import the project, please do the following steps:
3. Build and run
After project is imported, we can build and run the Game;
When your C++ game code is updated and build, it is required to refresh the Android project and build it again; This is not automatic here;
4. Build and run using Cocos command
There is a more easy to build and run the android project (I am using this now);
